Getting started with ZX Spectrum Development
Excited by meeting Henrique Olifiers and Jim Bagley at last year’s Revival 2016, I was all set to start on developing a game for the upcoming Spectrum Next.
It’s taken them slightly longer than expected to launch the Kickstarter for this absolutely stunning looking machine; tweaks to the spec being the main reason for the delay. The team are super passionate about delivering something that really captures the essence of the Spectrum, while bringing it up-to-date with new abilities that it could never have had back in the day.
That Kickstarter is already well over its initial goal; as I write this, it’s sitting at £431,013 - the target amount was £250,000. It’s looking likely that it’ll meet at least the next stretch goal at £450,000 by the end of this week, and hopefully then blast on to meet the others.
All this has gotten me excited about Spectrum development again, and so I’m looking at setting up a development environment to make it easier for me to do so. Bear in mind that I was a kid when I had my Spectrum back in the 80s and early 90s, so any programming I did was fairly limited. I barely touched machine code, although I did experiment a little with a cool package called White Lightning (not the cider - it was a version of FORTH intended specifically for games programming).
I’m working on a Mac, so not all of the information I share here will necessarily be relevant to other environments. That said, I expect to mostly be working with Z80 Assembly language which will be relevant.
Since I don’t yet have my Next, I’ll be working in an emulator. I’m told that ZEsarUX is the best emulator currently available, and it’s supposed to be able to emulate the TBBlue, the forerunner to the Spectrum Next. I’ll also need to be able to compile my programs, and Z88DK seems to be the best solution for that. It’s going to take me a while to cobble these together, but I’m sure I’ll get there in the end :)
My first challenge to myself: be able to get a machine code program running that will clear the screen. Sounds simple, right? Well, Paul Land posted a very useful Spectrum memory map on his website. As I understand it, I should be able to clear the screen by blanking out all the bytes from $4000 (16384) to $5AFF. I’ll give that a go, and update this post with my progress. And an video of it, if I get that far…
I’ve also found these very good videos by Michael Daley, who recommends a slightly different toolset for building Spectrum software… part 1 is here, and part 2 is here. Michael recommends using ZXSP, and the Pasmo assembler. He’s also taken the time to explain how to set up building your programs from within Sublime Text 3, which I found extremely useful. Michael is the author of SpectREM; I’d assume that means he’s moved away from ZXSP since his earlier videos ;)
Progress
After watching the Michael Daley videos I mentioned above, I got a (slightly less elegant) development environment configured. I’m currently using Atom, Pasmo and ZXSP.
Atom
Well, it’s just a text editor, which is all that we really need. I’ve installed
the language-z80asm package to get some minimal syntax highlighting. It’s not
brilliant, but it does the job for now.
You can get Atom from the official website.
Pasmo
Pasmo seems to be pretty highly recommended. It can even compile to .TAP files,
which is rather handy. There wasn’t a precompiled version for MacOS, so I had to
do that part.
Download Pasmo from the website here. You can try the preview release of 0.6.0 if you like, but I’m using 0.5.4.beta2. For MacOS, you’ll want the Gzipped tar file. The Mac can unpack that format natively.
To compile it, you’ll likely need Xcode installed, or at least the command-line tools. Getting those setup is beyond the scope of this post, and is well documented elsewhere.
Once you’ve downloaded and unpacked the .tgz file, you’ll want to switch into
the folder you unpacked it into, and run the following commands:
./configure
make
You could also run make install; I didn’t. If you’re like me, you’ll want to
be able to run Pasmo from anywhere, so copy it to /usr/local/bin with the
following command:
cp pasmo /usr/local/bin
If you haven’t got access to that folder (I’m not sure if you can write to it by default), then just copy Pasmo to your home folder for now.
ZXSP
ZXSP hasn’t been updated in a while, but it’ll do for the moment. SpectREM looks nice, but I couldn’t find a precompiled version - I built my copy in Xcode.
Download ZXSP from the creator’s website;
I chose zxsp-0.8.0.pre27.zip, but that might have changed by the time you read
this.
Unpacking that will give you a Mac app, which you should drag to your Applications folder as you would any other app. That’s all you need to do for now.
Your first code
Ok. This is the (not very) exciting bit. We’re going to start by clearing the screen. I know, I know.
Open Atom (or your preferred text editor), and create a new file. I usually save
my new files immediately, because I like to save early and often. I’ve lost too
many hours of work by not doing so. Make sure you save the file with an .asm
extension, to make your life easier later on.
You’ll want to add the following code:
; This is where your program starts in RAM.
org 40000

; Clear the screen to black.
    ld a,71         ; White ink (7), black paper (0), bright (64).
    ld (23693),a    ; Set our screen colours.
    xor a           ; Load accumulator with zero.
    call 8859       ; Set permanent border colours.
    call 3503       ; Clear the screen, open channel 2.

; Pasmo needs this to know where to start running your program from.
; It should be the same as the address you specified at the top!
end 40000
Save that as something like clear-screen.asm, and open a Terminal window in
the folder where you saved it.
Now, use the following magical invocation to compile that code into a Spectrum
.TAP file:
pasmo -1 --tapbas clear-screen.asm clear-screen.tap >> debug.txt
Let’s break that down a bit, so that you know what we’re doing.
The -1 means that Pasmo will output a log of the compiled output. You can open
this in Atom alongside your code. I don’t really understand this yet, but I’m
told it’s useful :)
The --tapbas means that Pasmo will create a .TAP file with a BASIC loader
that will automatically execute your code. This is great. Saves messing around,
you can load the .TAP file straight into your emulator.
The third parameter is the name of the file you’re compiling.
The fourth is the name of the output file. In this case, you’ll see that I’ve
given it the extension of .tap, which is what we’re producing.
The final part of the command redirects the output from Pasmo into a text file
called debug.txt; this is our debug log.
All being well, you should now have a clear-screen.tap file in the same folder
with your source code. If not, you may have made a typo. Check the listing above
and make sure you haven’t!
Now, load up ZXSP or your emulator of choice (if you’ve got real hardware handy, you should also be able to load the TAP file there, but I don’t have that at the moment). Loading the TAP file should automatically execute your program, and give you a black screen. Amazing, isn’t it?
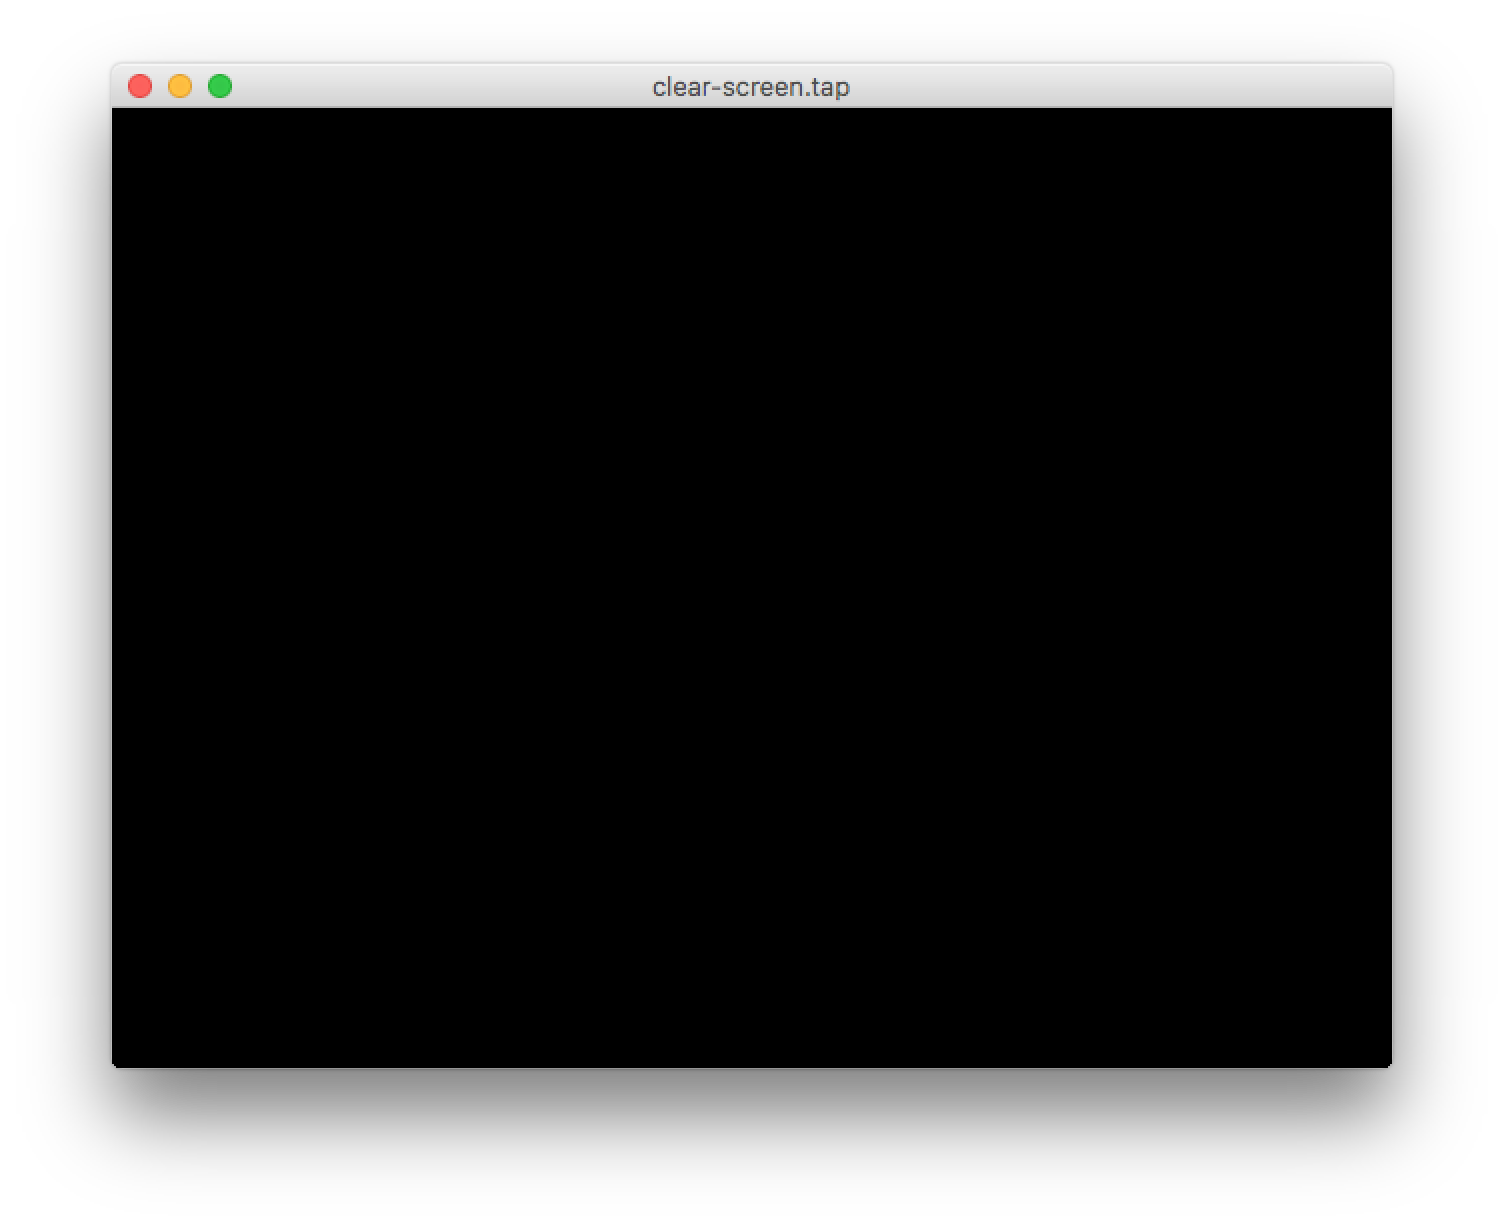
…. applause ….
Ok, so it’s not that exciting. But it is machine code. Let’s modify it slightly, so that you can understand what’s going on. We’re going to change the colour of the screen again.
The Speccy, in its original form at least, isn’t terribly colourful. It has 8 colours; we set ink and paper colours at the same time, and also control whether it should be bright or not. That’s all held in a single byte, at position 23693, which corresponds to the permanent colours - that is, those colours will stay set until you override them with another value (look at Paul Land’s page) to confirm that).
The colour we chose earlier was black, with white ink and bright mode set, adding up to a total of 71. This is made up as follows:
INK (0-7) + PAPER (0-7 * 8) + BRIGHT (0/64)
The colours are:
- 0 = Black
- 1 = Blue
- 2 = Red
- 3 = Magenta
- 4 = Green
- 5 = Cyan
- 6 = Yellow
- 7 = White
So, if we wanted to make the screen cyan with bright yellow ink, we’d go for:
INK (6) + PAPER (5 * 8 = 40) + BRIGHT (64) = 110
Let’s try that.
; This is where your program starts in RAM.
org 40000

; Clear the screen to black.
    ld a,110         ; Yellow ink (6), cyan paper (5 * 8), bright (64).
    ld (23693),a    ; Set our screen colours.
    xor a           ; Load accumulator with zero.
    call 8859       ; Set permanent border colours.
    call 3503       ; Clear the screen, open channel 2.

; Pasmo needs this to know where to start running your program from.
; It should be the same as the address you specified at the top!
end 40000
Compile that, and load it back into the emulator. You’ll end up with the screen being cyan in the middle, and with a black border.
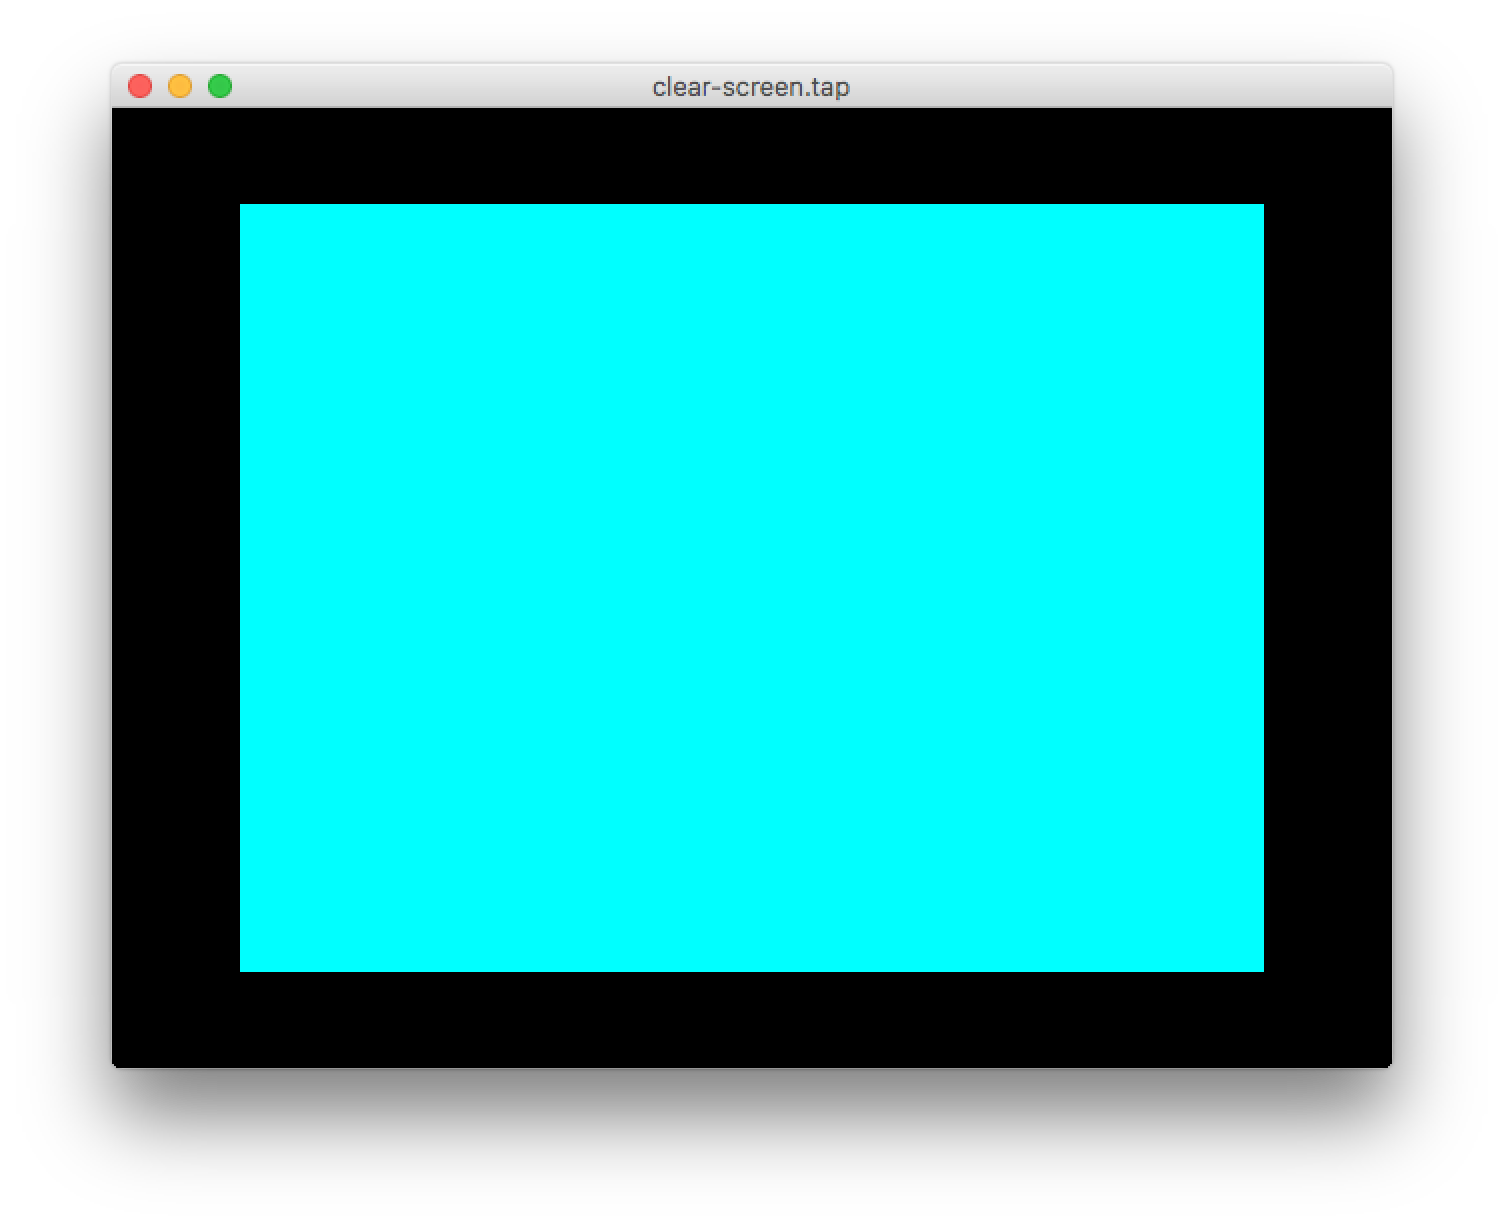
That’s not quite right. I wanted the entire screen to be cyan, not just the middle bit. So what did we do wrong? The secret is in the third line:
xor a
This sets the accumulator back to zero. Zero means black. That’ll be why. Let’s
try it, and see if we’re right. Change the xor 0 line to the following, and
recompile/reload:
ld a,5 ; Set the colour to cyan (5).
That’s better. Now you should have this:
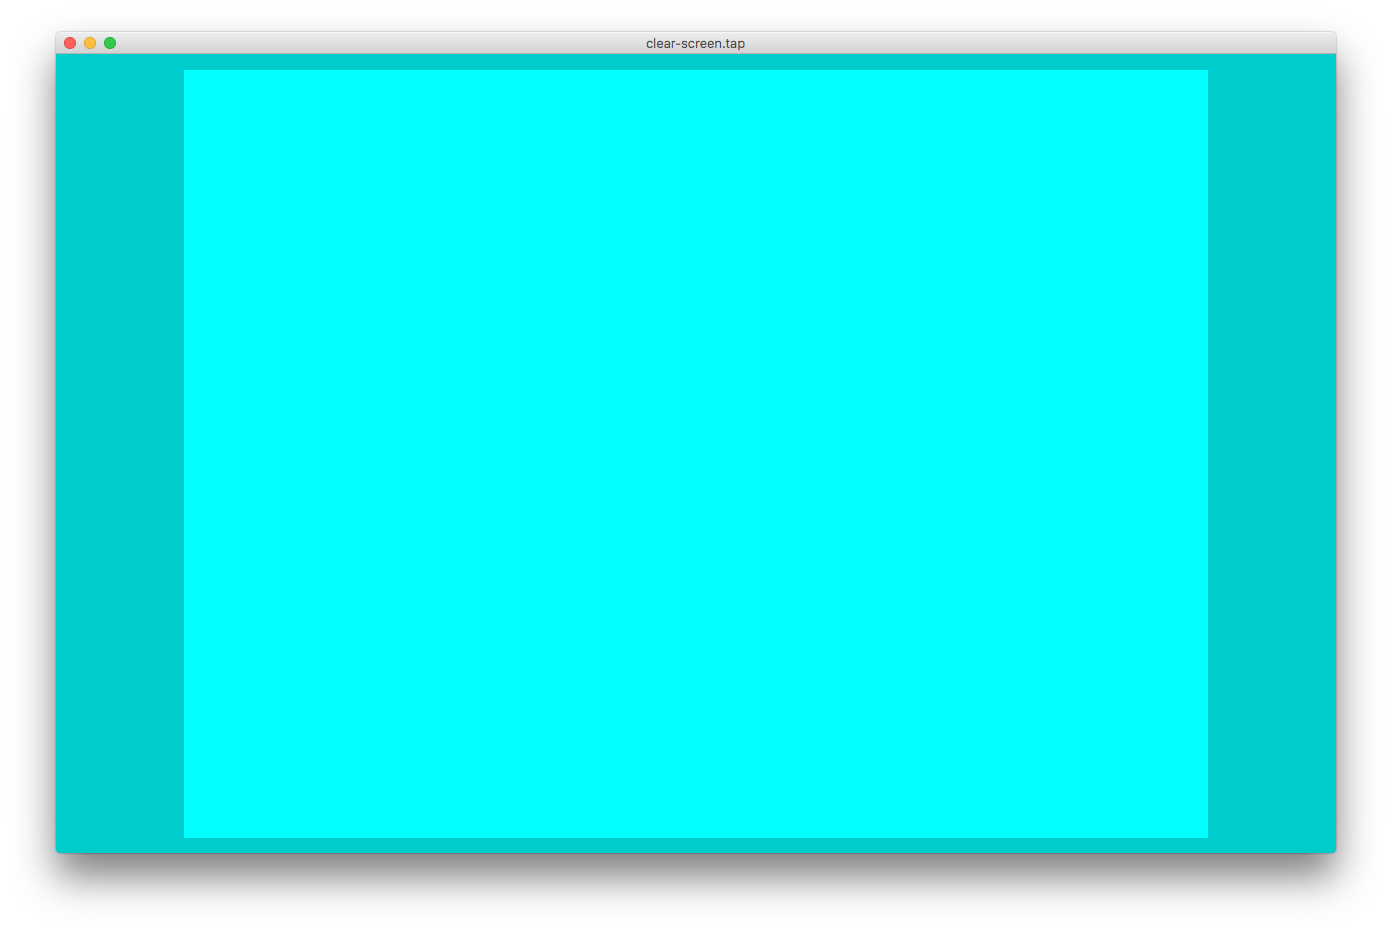
That’s still not quite what we want though. Unfortunately, unless I’m missing something obvious, you can’t set the border colour to be a bright shade. Only the three least significant bits of the byte are used, which if you know any binary means you can only represent 0-7 - just the colours we know, then!
So, I’m compromising. Let’s make the centre of the screen NOT bright. Here’s the modified code:
; This is where your program starts in RAM.
org 40000

; Clear the screen to black.
    ld a,46         ; Yellow ink (6), cyan paper (5 * 8), not bright (0).
    ld (23693),a    ; Set our screen colours.
    ld a,5           ; Set the colour to cyan (5).
    call 8859       ; Set permanent border colours.
    call 3503       ; Clear the screen, open channel 2.

; Pasmo needs this to know where to start running your program from.
; It should be the same as the address you specified at the top!
end 40000
And the result:
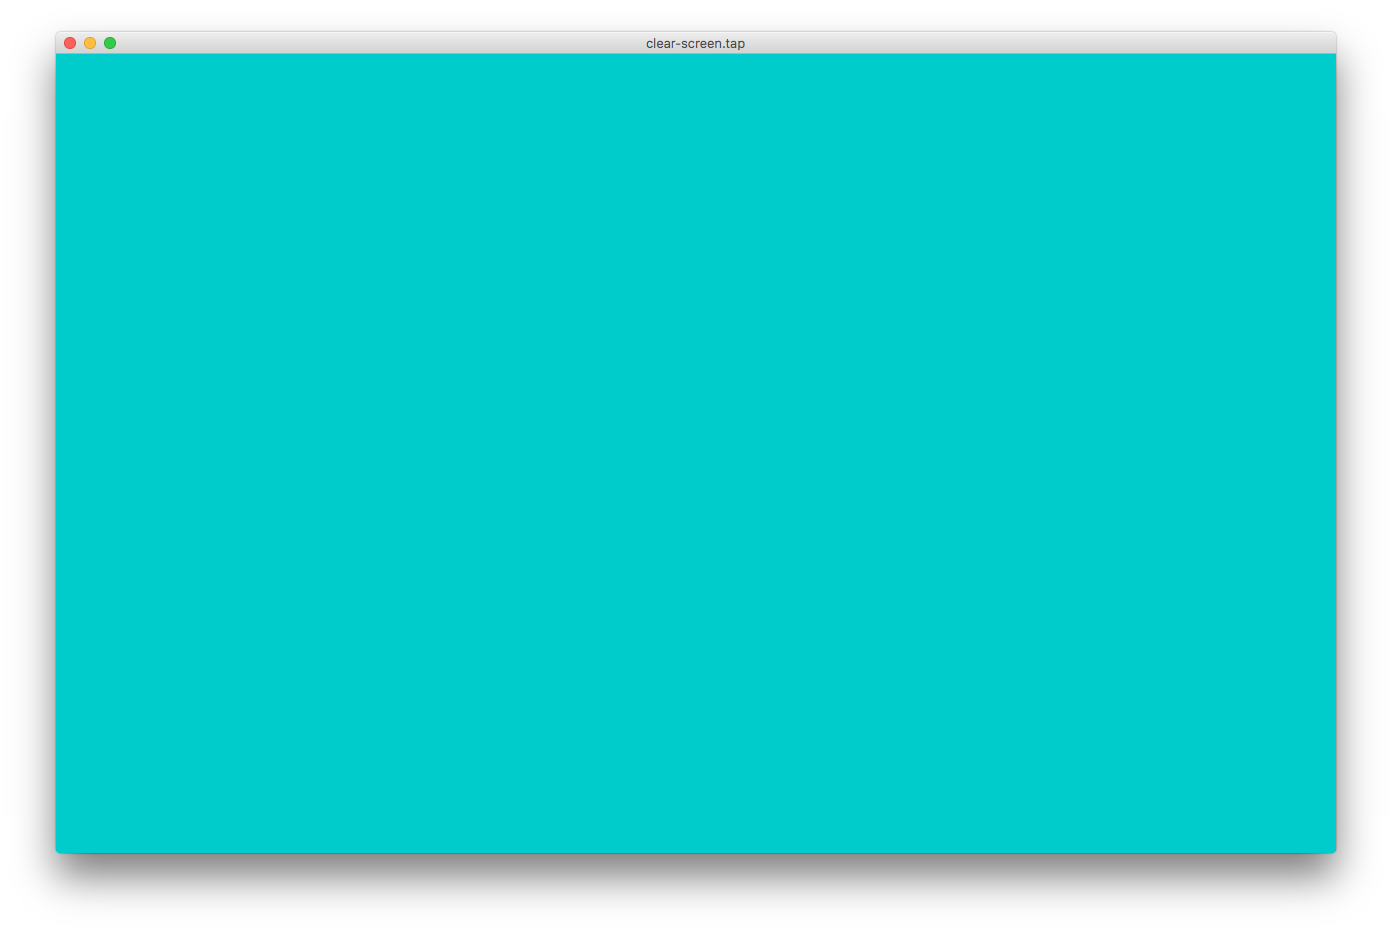
Yes, that’s what we wanted.
More next time. Maybe we’ll even print our names… or something equally as exciting.